Creating or Installing ASM instance.


There are three ways to create Oracle ASM

1) Using DBCA
2) Manual Creation
3) Using Oracle ASM Libraries

Now we will see how to configure ASM instance by using DBCA (Database Configuration Assistance)

In order to create Oracle ASM instance, first you need to create Rawdisks
( Here I am using VMWARE workstation to generate Virtual Raw Disk). You all may know how to create it. If not, check my previous post or Click here


Steps to Create ORACLE ASM:


1. After successful creation of raw disks. Log In as ORACLE user and connect to your target database as SYSDBA


2. Log out database Check that listener started or not. And check Your database is registered to listener or not using following command

$ lsnrctl status


3. Now it times to run DBCA as Oracle User. 


A graphical window will open click Next and select configure Automatic storage management


4. Give password for ASM Instance and click on next


 Now a warning window will appear just click OK

5. Now Creating disk groups and adding disks to group. We have four raw disks, What I will do is I will create one diskgroup named DATA  and I will add Raw1 and Raw2 to DATA diskgroup. Check below figure for better Idea


6. Now create another diskgroup Named Recovery to using Raw3 and Raw4


7) Now ASM instance is created. It will ask for perform another action. Click on NO

8) You are about to completed ORACLE ASM instance

Export ORACLE_SID=+ASM
sqlplus / as sysdba


This is one of the easiest way to create ASM instance. In our next session we will try to learn more about ASM

Thanks
Sagar 


Creating Raw disks for ASM (ORACLE ASM)

What is Oracle ASM?


Automatic Storage Management (ASM) is a feature provided by Oracle Corporation within the Oracle Database from release Oracle 10g (revision 1) onwards. ASM aims to simplify the management of database files. To do so, it provides tools to manage file systems and volumes directly inside the database, allowing database administrators (DBAs) to control volumes and disks with familiar SQL statements in standard Oracle environments


Automatic Storage Management (ASM) simplifies administration of Oracle-related files by allowing the administrator to reference disk groups (rather than individual disks and files) which ASM manages.


The ASM functionality is controlled by an ASM instance. This is not a full database instance, just the memory structures and as such is very small and lightweight.


Steps to create raw disks


I am Creating Raw disks using vmware workstation. Check below picture, how to create raw devices


Now you created One disk


Now create three more disks in the same way as shown in figure

2. Now Power on virtual Machine. Log in as root user
    Issue commands as shown in figure and Check list of partitions on your server


If you see the above picture. You may notice sda. That is main disk sda1, sda2  are partitions of sda
sdb, sdc, sdd sde are the raw disks that we just added.

3. So now we need to create at least one partition one each disk.

How? check below picture.


4. Repeat above steps for remaining three disks. After done, once again execute cat /proc/partitions


5. Now open /etc/sysconfig/rawdevices and add following lines:

/dev/raw/raw1 /dev/sdb1
/dev/raw/raw2 /dev/sdc1
/dev/raw/raw3 /dev/sdd1
/dev/raw/raw4 /dev/sde1

for better Idea check below picture


After adding lines save it

6.  Restart the rawdevices service to make your changes effective.

How to restart services check below picture


7) Now give access to oracle user to use these raw disks

Execute commands as shown in figure


Now you can use these raw disks as ASM disks

In our next session we will start create ASM instance..

Thanks
Sagar


Installation of STATSPACK and Using (Oracle10g)


What is STATSPACK?

STATSPACK is a performance diagnosis tool available since Oracle8i version. The Oracle STATSPACK utility is one of the most exciting Oracle enhancements. The best feature of STATSPACK is that it stores Oracle performance information in a set of 25 tables that can be used to develop historical trends. 
By interrogating these tables, we can gain tremendous insight into the relative performance of their databases.

Steps to install Statspack (ORACLE 10g):

1. Connect to database as SYS user and check is there any user named PERFSTAT.


It displays no rows selected. What does it means, Statspak not installed on your database. 

2. Now we have to execute a script called spcreate.sql. This script is under oracle home/rdbms/admin directory 

Run this script as SYSDBA


3. Now it will ask for password, give password of your own. I am giving password as oracle.
Next it will ask for default table space, Give SYSAUX  (Note: Don't Give system tablespace as default tablespace for statspack,  Actuvally it won't take even if we gave system.)
Next it will ask for Temporary tablespace, give TEMP.


After giveing above steps you are about completed installation STATSPACK on your database.

4. Now what you need to do is. Connect to database as PERFSTAT user and issue the command for checking table in PERFSTAT schema.

SQL  > select * from tab;


5.  Now select any table in that 68 tables and issue select * from table_name to see the content.


You can see above picture. There is no data in 68 tables in PERFSTAT schema. why because, We just completed installation of STATSPACK. We haven't start using it yet.

6.  Now two snap shots by using following command as shown in figure. Why two? We need atleast two snapshot to compare performance of our database on different time intervals right? That's why we need two.

SQL > exec statspack.snap;


 7. We have two snapshots available. Now how to compare these two. For this we need to execute another script called spreport.sql.

When you execute this scrip. You can see DBID, name of the Database, host name and  the total  (executed) snapshots.


You all know that I installed Statspack and created two snapshots. If you see below picture. You may find out no of snapshots and unique number of snapshot as well time.


8) Now we need two compare two snapshots so enter the snapshot begin snapshot unique numbers and end snapshot unique number as shown in figure.

After that Statspack will generate report. In order to view that we need to give a name.


9. Now statspack report is generated. Let's take a look at that report.


By Using above report we  can check the performance of the database. Where the system performance is effecting. you will get a clear idea, what cause effecting performance of database.

10. Now check the content on tables on perfstat schema. 


By using these table we can improve performance of the database

Thanks
Sagar


Oracle 10g Database cloning

What is Database cloning?

Database cloning is nothing but creating a Identical copy of existing database.

There are so many reasons for cloning database.
1) Every company will have Production , testing and development database. Developers must not develop database in Production database right? Tester must not test reports or database whatever on Production database right? Why because it will effects on performance of production database.

2) If DBA want to change dbname or DBID of the database

3)Relocating an Oracle database to another machine.

4)Moving Oracle database to new Storage media.

etc...

There are three ways to clone database

1) Clod cloning
2) Hot cloning
3) RMAN cloning

Today i will show How clone database using Hot cloning. Cold cloning is very easier to clone by using OS commands. RMAN cloning will talk at time of RMAN concepts.

Database cloning using Hot Backups:

Hot database cloning is more suitable for databases which are running 24X7X365 type of databases and is done using the hot backup. For hot database cloning, database has to be in archivelog mode and there no need to shutdown the database.
You already now, how to take backup database hot. If not please check my previous post.


1) i)connect to database .
    ii) Check to which database you are connected.
   iii) Check archivelog status
  iv)  Create a table (for Example) and create log switch.


Database name is PROD.


Confirm that we created table and log switch


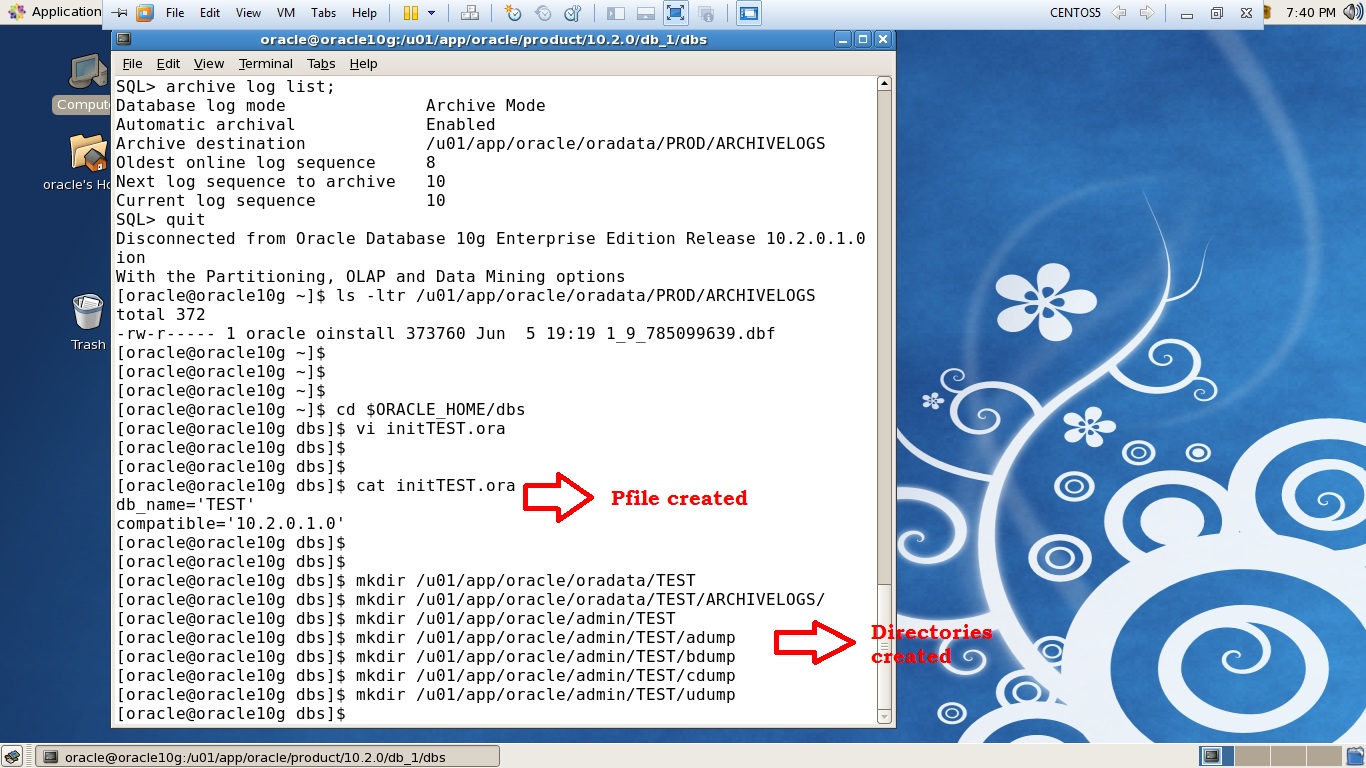
2) So, I have database called PROD, I want to clone PROD database to another database called TEST.
    So create necessary parameter file and directory.
 
   i) Go to ORACLE_HOME/dbs directory and create pfile called initTEST.ora
      and insert db_name and version as show in below picture.


Check Parameter file and create required directories


3) Put the Tablespaces in backup mode and copy all datafiles to $ORACLE_BASE/oradata/TEST Directory 


Copying is not possible without take tablespaces to hot. So bring them to hot and copy.


Databfiles are copied to $ORACLE_BASE/oradata/TEST Directory.

Go to Oracle then Issue the command end backup and then create one more switch.


4) Now control files. Make a backup control files to trace. How?
   Check below picture.


backup trace file of controlfile is created go to that location and edit it.

5) Start delete lines carefully until you find STARTUP NOMOUNT line, then make necessary changes and
    and make finally as shown in figure.

NOTE: You need to very careful here to make it. If single letter goes wrong your database will not clone.


You are almost done.

6) set Oracle environment as TEST and run the script as shown in picture


You have datafiles created. Now You have control file created.

7) Now exit from TEST Database and Log on to PROD Database then create couple switches.


Confirm: switches are created or not.


8) Now log on to TEST Database. Set switches source in TEST database and apply switches.


9) Apply all the switches as shown in figure.


10) After succesfull execution of log files, now open database with resetlogs. 


11) Now check in TEST database accounts table cloned or not? open another terminal log in to PROD database for crosschecking.


Now you are done with cloning..

If you got any error while cloning. Mail me I will reply back to with solutions

Will get back to you with new topic.

Thanks
Sagar.