How to change the name of the database?

1) This topic will show you how change name and ID of the database.
    This feature is available from Oracle10g R2 and later versions of Oracle


Note: Changing the DBID of a database is a serious procedure. When the DBID of a database is changed, all previous backups and archived logs of the database become unusable.


You all may know my database names are VIDYA and SAGAR. Those who already watched my previous concepts. Now I will change my one of database named VIDYA to VEERA


Steps to change name of the database:


a) Check whether you are connected to right database or not? I am changing database name to VIDYA to VEERA. So i need to connect to database VIDYA


b) Now shutdown database and startup on mount state. If we start database at mount stage. It will read control files, You all may know control files have all key information of database, It contains name of the database. so we have to start database at mount stage.


c) Now logout of sql. And issue NID (new database ID) command as shown in picture
     $ nid target=VIDYA dbname=VEERA
       password= (sys password)
      NID tool will ask your confirmation. Press Y and ENTER


Database ID changed

d) Now wee need to change name of database, for that we need to change init parameter file and password file

i) changing init parameter file... You need to worry if you have init.ora.. If you have spfile, we need to convert spfile into pfile..
Because we need to change dbaname from VIDYA to VEERA in init.ora file. we cant open spfile because it is binary file. We can edit init.ora using Vi editor. because it is a text file. 
ii) Check below picture for converting spfile to pfile.
   I) go to ORACLE_HOME/dbs folder
   II) Make a copy of spfileVIDYA.ora to spfileVEERA.ora. Using 'cp' command
   

e) Now connect SQLPLUS and convert spfile to pfile. Check below picture for better Idea


f) Logout of SQLplus and delete spfiles spfileVEERA.ora and spfileVIDYA.ora then edit initVEERA.ora using Vi editor as shown in figure


g) change dbname as VIDYA to VEERA 
    and save it


f) We are done with parameter file modifications, now password file
   1) goto $ORACLE_HOME/dbs
   2) rm orapwVIDYA
   3) create new password file as shown in figure


g)  Now connect to database and start database on mount stage
     Then Open the database with Resetlogs option


You can check the name of the database using following command

SQL> select name from v$database;
SQL> select instance_name from v$instance;

You are changed your database name to VIDYA to VEERA successfully 

Thanks
Sagar

Get back to you with another topic


Manual Database Creation : Oracle10g on linux

You may all know about how to install Oracle 10g R2 on Linux and you may also know, how to create a database by using DBCA (Database Configuration Assistant).

Today we will see how to create Database Manually without using any DBCA

In my last session. I created a Database named VIDYA. How To check the name of the database?

a)Open Terminal
b) connect as sys
c) Issue following command
    SQL> select name from v$database;


Steps to create Database called SAGAR:

1) Go to Directory named dbs. This Directory located generally Next to $ORACLE_HOME Directory
     a) The folder contains parameter files of database and password file of the current database.


     b) Now Create a pfile (parameter File) from SPfile (Sever parameter file)
     c) Follow the steps as shown in picture to create pfile from spfile.


2)  Now Edit parameter file using Vi command
     a) vi initSAGAR.ora
     b) Replace VIDYA with SAGAR in all lines as shown in figure
 

3) Create necessary Directories as shown in picture


4)  Make a directory called scripts and   write a script to create database
     a) follow as shown in picture


5) Write a script as shown in figure and save it in scripts folder


6) Now set environment
      a)Vi /etc/oratab
      b)SAGAR:$ORACLE_HOME:N


    c) Issue commands as shown in figure to set environment


7) start Oracle Instance. 
    a) Issue the command  startup nomount; Because controls files hasn't created yet.


8) Run Database  creation  script dbcreate.sql


9) No need to worry about following error. It's because wrong name of undo tablespace try to re-run the script it will fix

10) After issuing command for run dbcreate.sql script. your new Database named SAGAR is created


11) check you  logged in on correct database by issuing following command
    
   a) select name from v$database;


 creating database manually without using DBCA is completed

I will be back with new topic

Thanks
Sagar


Create Database using DBCA (Database Configuration Assistant)

1) You all may know how to configure your UNIX server to install ORACLE 10R2. If you have any doubts
     on setting up hosts, installing rpm's, configuring kernel parameters and etc., please check my third post
    (http://sagardba.blogspot.in/2012/05/installing-linux-and-oracle-10g-r2-on.html) to configure
     requirements.

2) Once you are done with configuring requirements, which makes clean Oracle installation, such as kernels,
     rpm's etc.  Log in as ORACLE user issue the following command..
    a) ./runinstaller


3) As we need to create database using DBCA. Just you can install oracle software, For that you need to 
    Advanced installation and then next


4) a) Now select installation type, select Enterprise Edition 
        and click next and then next 
    b) Now prerequisite checks
     

   c) It shows one requirement need to to verify. You no need to worry about that warning. Simply mark on 
       it as shown in figure and then select next .
5) Now select 3rd option install software only and then click on next


Now Oracle software is installing on your LINUX server.

6) Run the scripts as root user..


7) After completion of Oracle software installation. Log in as Oracle user 
   a) open terminal
   b) type dbca as shown in picture.
   c) A new window will open to create a database, click next


8) Now mark on create database,
    and then click on next. You can see in picture two options under Create database option are not 
    Highlighted, which I marked Green .
   
   Since we installed only Oracle software, as we don't have even a single database those two options are 
   not highlighted. We will see how to use those two options in our next sessions.


9) a) Tick on General purpose and click on next
    b) Give database name of your choice and click on next


10)  UN-MARK configure database using enterprise management

11) Give password of your own to your database and click on next

     
12) a) Now select File system and click next
      b) Mark second option and Give the path where datafiles you want to place as shown in picture and  
         click next


13) Now flash recovery, simply click next and  finish and then OK. AS shown in figure
     

14) Now password assistant. click on EXIT. Now you are about to complete configuring database using 
      DBCA

    a) Open terminal
    b)sqlplus / as sysdba
    c) After connected to Oracle, Issue below command
    d) select name from v$database;
    e) select name from v$controlfile;
    f) select name from v$datafile;


     Now you are about to completed creating database named vidya.

I will be back to you with another topic..

Thanks
Vidya Sagar


How to Install Oracle 10g R2 on RHEL 4 using VMWARE

1) Download Oracle10g R2 from www.oracle.com. Convert downloaded file into ISO using AnyToiSO or
    Magic ISO. Mount that Image into VMWARE workstation. Copy Zipped file on Desktop and EXTRACT
    it. Now you are able to see the folder named Database.


2) Now Open the terminal and do the following steps
     $ vi /etc/hosts
        a) type ifconfig to check your IP Address 
        b) Press ' i ' to insert text, Go to Last line and insert your IP Address and give machine name as Linux
            and Linux as shown in figure 
        c) Press esc and type :wq then ENTER

     
3)  Now change kernal parameters
     $ vi /etc/sysctl.conf (in terminal window)       
     a) Press ' i ' to insert text, Go to Last line and insert following lines. check picture for better Idea

       kernel.shmall = 2097152
       kernel.shmmax = 2147483648
       kernel.shmmni = 4096
       # semaphores: semmsl, semmns, semopm, semmni
       kernel.sem = 250 32000 100 128
       fs.file-max = 65536
       net.ipv4.ip_local_port_range = 1024 65000
       net.core.rmem_default=262144
       net.core.rmem_max=262144
       net.core.wmem_default=262144
       net.core.wmem_max=262144

     b) Press esc and type :wq then ENTER  


4)  Run the following command to change the current kernel parameters     $ /sbin/sysctl -p
     
    a) Execute below command
        $ vi /etc/security/limits.conf
        and press enter


5)   Press ' i ' to insert text, Go to Last line and insert following lines. check picture for better Idea
 
           *               soft    nproc   2047
           *               hard    nproc   16384
           *               soft    nofile  1024
           *               hard    nofile  65536

    a) Press esc and type :wq then ENTER


6) we need to check SELINUX flag is disable or not. If it is not in disable state change it to disabled by  
    using  vi command.
   1) To check whether it in disabled state or in enforcing state.. Issue the following command
        cat /etc/selinux/config 
   2) If not change it to disabled


7) Now install required packegs

Eject the Oracle 10g Iso and mount RHEL 4 second cd and execute (Install following) following commands

# From RedHat AS4 Disk 2
cd /media/cdrecorder/RedHat/RPMS
rpm -Uvh setarch-1*
rpm -Uvh compat-libstdc++-33-3*
rpm -Uvh make-3*
rpm -Uvh glibc-2*


8) Similarly eject 2nd CD and mount 3rd CD execute following RPMS.
  check pictures for Idea
   
   # From RedHat AS4 Disk 3
   cd /media/cdrecorder/RedHat/RPMS
   rpm -Uvh openmotif-2*
   rpm -Uvh compat-db-4*
   rpm -Uvh libaio-0*
   rpm -Uvh gcc-3*


9) To fix that error do following steps. Check picture for better Idea
    
[root@localhost RPMS]# rpm -Uvh gcc-3*
warning: gcc-3.4.3-9.EL4.i386.rpm: V3 DSA signature: NOKEY, key ID db42a60e
error: Failed dependencies:
        glibc-devel >= 2.2.90-12 is needed by gcc-3.4.3-9.EL4.i386
    Suggested resolutions:
        glibc-devel-2.3.4-2.i386.rpm
[root@localhost RPMS]# rpm -Uvh glibc-devel-2.3.4-2.i386.rpm
warning: glibc-devel-2.3.4-2.i386.rpm: V3 DSA signature: NOKEY, key ID db42a60e
error: Failed dependencies:
        glibc-headers is needed by glibc-devel-2.3.4-2.i386
        glibc-headers = 2.3.4-2 is needed by glibc-devel-2.3.4-2.i386
    Suggested resolutions:
        glibc-headers-2.3.4-2.i386.rpm
[root@localhost RPMS]# rpm -Uvh glibc-headers-2.3.4-2.i386.rpm
warning: glibc-headers-2.3.4-2.i386.rpm: V3 DSA signature: NOKEY, key ID db42a60e
error: Failed dependencies:
        kernel-headers is needed by glibc-headers-2.3.4-2.i386
        kernel-headers >= 2.2.1 is needed by glibc-headers-2.3.4-2.i386
    Suggested resolutions:
        glibc-kernheaders-2.4-9.1.87.i386.rpm
[root@localhost RPMS]# rpm -Uvh glibc-kernheaders-2.4-9.1.87.i386.rpm
warning: glibc-kernheaders-2.4-9.1.87.i386.rpm: V3 DSA signature: NOKEY, key ID db42a60e
Preparing...                ########################################### [100%]
   1:glibc-kernheaders      ########################################### [100%]
[root@localhost RPMS]# rpm -Uvh glibc-headers-2.3.4-2.i386.rpm
warning: glibc-headers-2.3.4-2.i386.rpm: V3 DSA signature: NOKEY, key ID db42a60e
Preparing...                ########################################### [100%]
   1:glibc-headers          ########################################### [100%]
[root@localhost RPMS]# rpm -Uvh glibc-devel-2.3.4-2.i386.rpm
warning: glibc-devel-2.3.4-2.i386.rpm: V3 DSA signature: NOKEY, key ID db42a60e
Preparing...                ########################################### [100%]
   1:glibc-devel            ########################################### [100%]
[root@localhost RPMS]# rpm -Uvh gcc-3*
warning: gcc-3.4.3-9.EL4.i386.rpm: V3 DSA signature: NOKEY, key ID db42a60e
Preparing...                ########################################### [100%]
   1:gcc                    ########################################### [100%]
[root@localhost RPMS]#


10) Eject 3rd CD and mount 4th Cd. Install following RPMS

  # From RedHat AS4 Disk 4
  cd /media/cdrecorder/RedHat/RPMS
  rpm -Uvh compat-gcc-32-3*
  rpm -Uvh compat-gcc-32-c++-3*


11) Now create groups and users 

Issues the following command and press enter

groupadd oinstall
groupadd dba
groupadd oper

useradd -g oinstall -G dba oracle
passwd oracle

give password of your own and confirm the password


12) Now Create the directories in which the Oracle software will be installed.

mkdir -p /u01/app/oracle/product/10.2.0/db_1
chown -R oracle.oinstall /u01


13) Now change the hostname 

Do following steps as shown in figure
   a) Applications --> system setting --> network 
   Double click on eth0 and type hostname as shown in figure


Press ok and close that programe it will ask for save changes. Click on yes and then OK

14) Issues the following command
      
      xhost +linux


15) Add the following lines at the end of the ".bash_profile" file by execute this command
  
 a) vi /home/oracle/.bash_profile
 b)  Press ' i ' to insert text, Go to Last line and insert following lines. check picture for better Idea


# Oracle Settings
TMP=/tmp; export TMP
TMPDIR=$TMP; export TMPDIR

ORACLE_BASE=/u01/app/oracle; export ORACLE_BASE
ORACLE_HOME=$ORACLE_BASE/product/10.2.0/db_1; export ORACLE_HOME
ORACLE_SID=orcl; export ORACLE_SID
ORACLE_TERM=xterm; export ORACLE_TERM
PATH=/usr/sbin:$PATH; export PATH
PATH=$ORACLE_HOME/bin:$PATH; export PATH

LD_LIBRARY_PATH=$ORACLE_HOME/lib:/lib:/usr/lib; export LD_LIBRARY_PATH
CLASSPATH=$ORACLE_HOME/JRE:$ORACLE_HOME/jlib:$ORACLE_HOME/rdbms/jlib; export CLASSPATH
#LD_ASSUME_KERNEL=2.4.1; export LD_ASSUME_KERNEL

if [ $USER = "oracle" ]; then
  if [ $SHELL = "/bin/ksh" ]; then
    ulimit -p 16384
    ulimit -n 65536
  else
    ulimit -u 16384 -n 65536
  fi
fi


c) Press esc and type :wq then ENTER

16) Open computer on desktop --> file system --> home--> oracle
       move database file from desktop to oracle folder

17) Now restart the machine and log in as oracle and password what you gave at step 11.


18) After log in to oracle user, open terminal and issue the following command

 $ export DISPLAY=:0
 $ cd /home/oracle/database
 $ ./runInstaller

a) A new window will appear don't change database name then enter password and confirm it. Please keep 
    password in your mind or make a note. without that password you can't login as dba
b) click on Next and Next


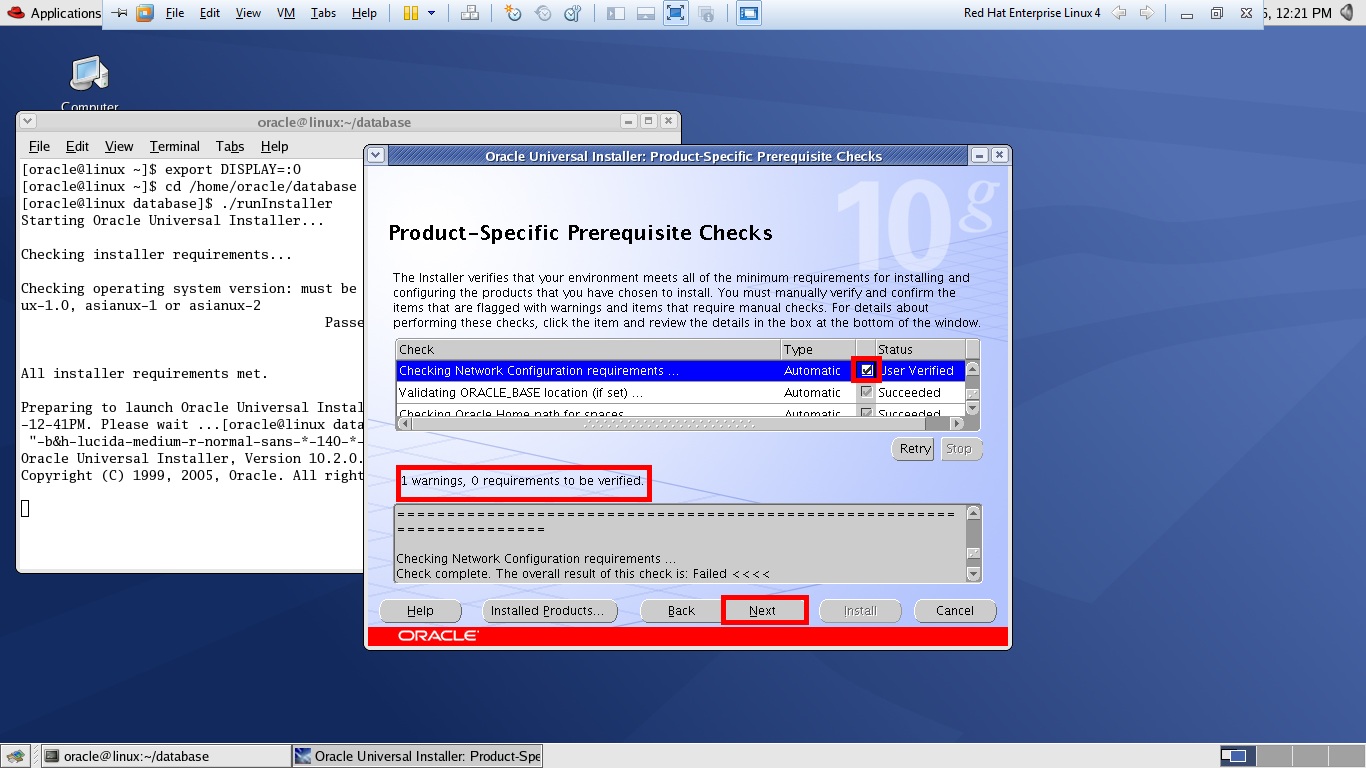
19) System requirements to be verified. you may file on network configuration requirement. Due to dynamic
        IP Address. click on user verified and then next


20) Next Click on Install

21) don't make any changes on password management. simply click on OK


22)  Executing scripts as root user don't forget to switch the user as root
     a)  open new terminal 
     b)  $ su
       password: enter root password
     c)  execution of scripts:  for help, check below picture
     d) after completion of execution of scripts then click on OK


23) You are about complete Oracle 10g r2 installation on Linux. Oracle creates URL;s. Save all those in 
      text document
      a) Right click on desktop and select create new document
      b) open terminal 
          $ cd Desktop
          $ vi newfile
      c) Press ' i ' to insert text, Go to Last line and insert URL's
      d) Press esc and type :wq then ENTER  
      e) To view URL issue below command
           $ cat newfile


   Click on Finish.. You are completed installation of Oracle 10g on Linux using Vmware 

                                                In our next  Session I will show you how to shutdown and startup database

Thanks
Vidya